I LOVED this article! There were many things mentioned in the article that I do as part of 'Trusted Routine', and that I think are very important! :)
"In Search of Excellence" by Betty Tapping. Betty has been a long-time member and friend of Lakeshore African Violet Society. Although she has retired from growing African violets she still keeps up her connections with our society and still lives in our community. This article will help growers achieve excellence in their plants with tips from Betty, an excellent grower and exhibitor of African violets.
This article has all the basics, although they aren't laid out as 1, 2, and 3.
Do what Betty says, and you will have nice show-quality plants AND also be organized and neat!!!
The article is deceptively simple, and you might overlook these important things! So, allow me to give you a guided tour of the article!
First paragraph: Betty learn from others' wisdom, but allow yourself to experiment and learn from your mistakes! I would put this first in my article also: Learning, the easy way from someone else, or the hard way by trial and error, is the FUN of this African violet hobby!
Next in the article, Betty explains she always has plants at various stages of growth: from leaf pots with babies, young starters, mid sized pots, and larger show plants. This lets her use her space better. I agree!!!! This is one way I can list 149 varieties I have in my house, and have at least three plants of each variety! I do this!!!!
Betty says pot size is important. To me, pot size used is VERY important. Some varieties have smaller root systems, and thrive better in smaller pots. And pot size is most important in very small babies as you transplant from the mama leaf and again when the plant is mature such as more than 18 months old. I have certain pots that are shaped and sized just right, and if I have a small baby of a tempermental variety, I always put them in my 'good pots'!
"Some plants do perform better than others." NOTE THIS! Many people say: my violet isn't blooming. The first thing I want to know is the variety name. Sometimes it is a plant that takes longer to rebloom, or doesn't do as well in windowlight, or high temperatures. Some hybrids will do better than others. Read Betty's paragraph in the article.
I could go on and on.... each point in the article is a good one. Each sentence had something that I found made African violet growing easier, better, or more fun!

June 14, 2013
All Early 2013 Experiments End-- JUNE CONCLUSION
Updating Experiment #4 Comparing Soil Mix Additions
I didn't see much difference in these plants. The two pots with additions to my basic recipe did MAYBE hold water a bit longer than the slightly looser 1/3 peat 1/3 vermiculite 1/3 perlite. However, in March, all three plants were budded and blooming so I sold them at the Harlem Seed Show. If I had to choose one that did better, it would have been the plant in my basic soil mix without any additions.
I did not take a photo of them before I sold them! Sorry!
This photo was taken February 2.

Updating Experiment #3 Grow to Show Comparisons
I also sold several of these plants in March.
These photos were taken February 2nd.
Plants on the left of each photo was disbudded and the plant on the right was left bloom as it wanted.
All three of the disbudded plants were beginning to open buds and looked nice enough they were among the first to sell at the Seed Show!
Sanctuary:

Optimara Trinidad:

Not Star Eclipse (turned out to be Spectacular Blue!):

In all three sets of plants, the one on the disbudding schedule had more even foliage, and were just loaded with buds!
Updating Experiment #2 Watering Methods
I didn't take photos of these plants either! And they were all blooming or budded and I sold them!
I had four plants. Two were in saucers to be bottom watered, one was potted true Texas-style and water was kept at a constant level every day. One plant was on an automatic waterer using a circle of capillary matting with a 'tongue' hanging down in the water. The fourth plant was wicked using a piece of acrylic yarn.
Of these, the Texas-style and the wicked one using the yarn were noticably larger, and were a bit advanced in bloom. The one watered by saucer had wilted several times.
Updating Experiment #2 Soil versus Soil-Less

I have a recent photo of these plants!!!!
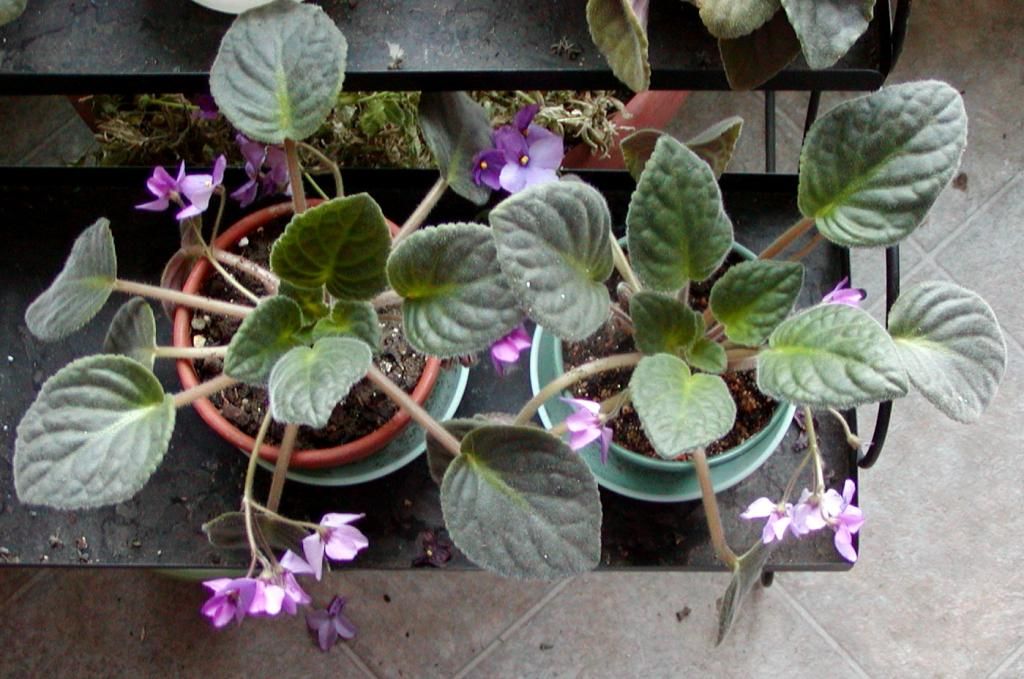
The following photo is taken June 114th:
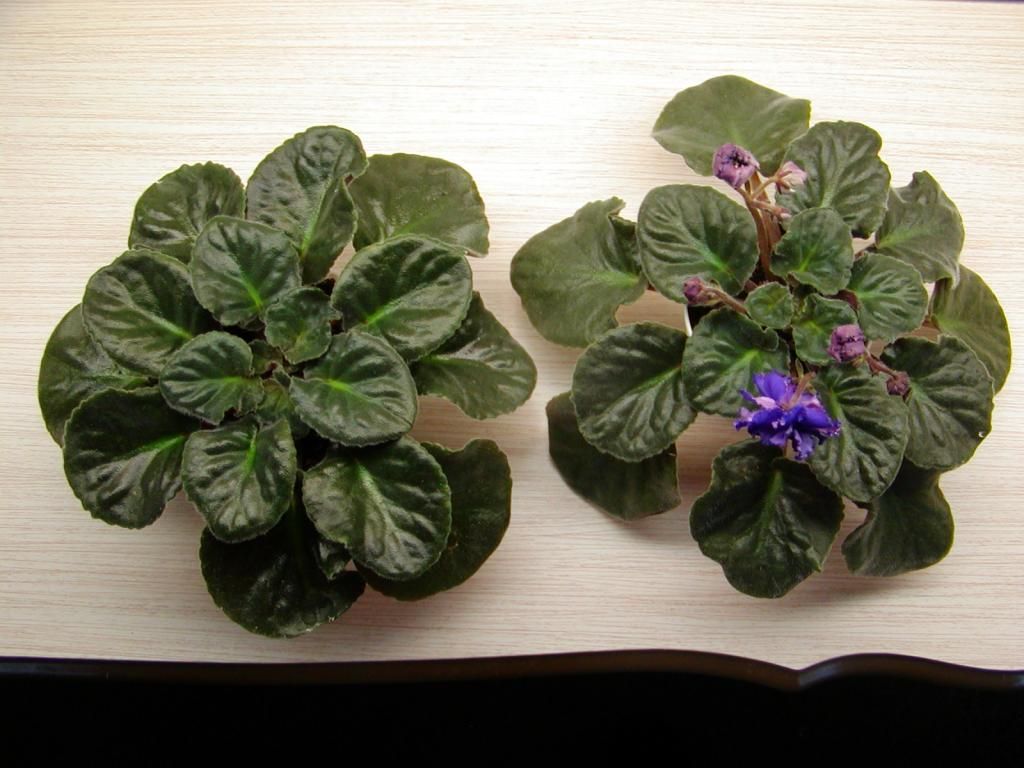
 The plant on the left is the Amethyst potted in my traditional mix. The Amethyst plant on the right is in a clay pot with garden loam.
Today, the plant in my traditional mix is larger with more leaves. At the moment, it has a great number of blossoms. Two months ago, mid-April, they both began a heavy round of bloom. The plant in the garden soil bloomed about a week longer, but in the weeks since, the plant in my traditional soil mix has sent up more total blossom stalks.
The plant in garden soil does go several days longer before needing water. The blossom stems are possibly shorter, but the leaf stems are longer. ?????
Right now, I like my traditional mix! :)
I didn't see much difference in these plants. The two pots with additions to my basic recipe did MAYBE hold water a bit longer than the slightly looser 1/3 peat 1/3 vermiculite 1/3 perlite. However, in March, all three plants were budded and blooming so I sold them at the Harlem Seed Show. If I had to choose one that did better, it would have been the plant in my basic soil mix without any additions.
I did not take a photo of them before I sold them! Sorry!
This photo was taken February 2.
Updating Experiment #3 Grow to Show Comparisons
I also sold several of these plants in March.
These photos were taken February 2nd.
Plants on the left of each photo was disbudded and the plant on the right was left bloom as it wanted.
All three of the disbudded plants were beginning to open buds and looked nice enough they were among the first to sell at the Seed Show!
Sanctuary:
In all three sets of plants, the one on the disbudding schedule had more even foliage, and were just loaded with buds!
Updating Experiment #2 Watering Methods
I didn't take photos of these plants either! And they were all blooming or budded and I sold them!
I had four plants. Two were in saucers to be bottom watered, one was potted true Texas-style and water was kept at a constant level every day. One plant was on an automatic waterer using a circle of capillary matting with a 'tongue' hanging down in the water. The fourth plant was wicked using a piece of acrylic yarn.
Of these, the Texas-style and the wicked one using the yarn were noticably larger, and were a bit advanced in bloom. The one watered by saucer had wilted several times.
Updating Experiment #2 Soil versus Soil-Less
In this experiment, one pot in each set was a clay pot with 100% garden soil, and a second pot was plastic with my traditional mix. In the set of smaller pots, a third pot contained Miracle Gro AV soil mix.
Final conclusions for this experiment:
In the set of smaller pots, the worst performing one was the Miracle Gro soil. This plant was smaller and slower to mature. I did fertilize this pot after the first month.
The small clay pot with garden loam bloomed a bit later but had 5 more leaves, even though the leaf span measured the same.
In the set of two plants of Amethyst, both plants struggled as they were in the window light, which was weak because of the winter season. I didn't have space or time to find a better place so there they remained.
The following photo was taken February 2nd.
I have a recent photo of these plants!!!!
The following photo is taken June 114th:

Today, the plant in my traditional mix is larger with more leaves. At the moment, it has a great number of blossoms. Two months ago, mid-April, they both began a heavy round of bloom. The plant in the garden soil bloomed about a week longer, but in the weeks since, the plant in my traditional soil mix has sent up more total blossom stalks.
The plant in garden soil does go several days longer before needing water. The blossom stems are possibly shorter, but the leaf stems are longer. ?????
Right now, I like my traditional mix! :)
April 7, 2013
Book Review: Arranging African-Violets
(excerpt from African-violet Arrangements in Home Decoration by Emily Stuebing)
Of the thousands of people who grow African-violets, only a few take advantage of the adaptability of these flowers for use in decorating. Distressed by the confinement of all this loveliness to pots and window sills, I began some time ago to experiment with the possibilities African-violets offer to the flower arranger. This book is a description of my discoveries and an attempt to entice those of you who love Saintpaulia to do some experimenting of your own.
African-violets as blooms or plants are perfect for use in many decorations. It is only a question of learning how to use them, and to begin, all you need is enough boldness to take your "violets" off the shelf. Don’t be discouraged by the neighbor who fixes you with a cold eye and says, "What are the rules for arranging Saintpaulias?" Nor by the superior aunt who says, "It’s an art, of course. All arts take years to learn."
Of course it’s an art but, in the beginning, look upon it as a folk art. All art began that way. The cave man, drawing for his own satisfaction on stony walls—who made the rules for him? Nobody. All art begins simply, by taking forms which nature gives us and arranging them into a design. Only please, let’s discover some design for African-violets newer than rows of pots on window sills!
Women are still saying to me, "Why not just cut my flowers and stick them in a vase? What’s wrong with that?"
Nothing, of course, except that sticking flowers in a vase is an automatic and uninteresting act whereas arranging flowers is an expression of personality. Once you have tried, however feebly,
to arrange some flowers into a design with a harmonious color effect, you have been for a time in tune with all artists, have known the urge to create something original and have a sense of fulfillment which follows self-expression in any form. With only flowers for material, you can paint a picture or tell a story. And the flowers you use, mark you, can be African-violets. It hasn’t been too many years since we had only horticultural shows. Gorgeous as some of the specimens were, even the growers began to tire of specimens in rows. Dahlia growers and other flower fanciers have asked me many times how their beauties can be brought in and used in the home, the church, the sick room. Man or Woman, a good grower who has taken a plant from seed to specimen bloom naturally wants to put it some place where it will show off to advantage. Only thus can the flower be enjoyed throughout its entire life. It is by this road, I am sure, that more and more men are coming to an appreciation of flower arranging.
And it is by this road, I hope, that African-violet lovers will come to an appreciation of arranging their jewels. To grow Saintpaulias, however rare or beautiful, is one thing. To enjoy arranging them is quite a different experience, something new and exciting.
If your first efforts are clumsy and not too successful, don’t worry. The flowers will wither and die in a few days and you can toss them out and start all over again. Suppose it had been an oil painting? There it would be, hanging on the wall year after year, for friends and relatives to moan about. The very fragility of flowers makes them ideal for experimental art.
One of the best things about a new interest, of course, is that it always leads to still another one. As it will be a new venture to arrange African-violets, so it will be a new venture to look for plant material that will be compatible with them. You will enjoy your Saintpaulias more if you build up a background for them, a frame to dramatize your prima donna. To find the foliage and plants for these backgrounds, acquire the seeing eye in your garden as well as on the highway. Collect some branches from your garden, starting perhaps by forcing some branches in the spring. This will be the beginning of a collection which you can continue practically all year. Dried materials are effective with "violets" so keep your eyes open for plants which can be dried and kept.
And now you’re ready. You have brought into the house some material you think will make a good background and you are prepared to sacrifice a few blooms from your African-violets. How do you start?
First of all, erase that frown. This is fun, remember? Stop worrying about the flower show. You're not ready for that yet, although you probably will be soon. Look around you for a moment. Let your home be your first guide. Is it formal or do you live a casual life here? Your "violets" will lend themselves to either type of surroundings but keep those surroundings in mind while you work. Are you a collector, perhaps of figurines? Later on I’m going to show you some pictures using collections of various things with the "violets." Meantime, have you a hobby of any sort? Could you work that into this first arrangement? Let yourself go and you will be surprised at the ideas which pop into your head. Maybe you would be more comfortable making a small beginning. If so, use only one or two blossoms and make a miniature arrangement for an end table.
Whatever you try to do, organize it into some sort of design, dramatize it in one way or another. I think most of us have an innate sense of good design, know by instinct an amazing number of "rules."
There isn't a person who doesn’t enjoy having flowers around unless it's hay fever season. And come to think of it, I never heard of anyone who was allergic to African-violets. So you’re ofi to a good start. There’s your first arrangement, finished and standing before you.
Now share it. Take it into the living room or to a sick friend—or to a well one for that matter! As you read on, you will learn more technique, but the basic technique of any art is the technique of sharing. The Chinese have been saying this beautifully for years. "Flowers leave part of their fragrance in the hand that bestows them."
The petals of flowers exhale moisture which is supplied through the stem. As soon as the stem is cut, air starts to go up its pores. If the air has time to go any distance before the stem is put into water, the water is absorbed very slowly because of the air above it. When moisture is exhaled from the petals faster than it comes up the stems, the flowers begin to wilt. Hence the first rule of conditioning is to get cut flowers into water as fast as possible.
HARDENING SAINTPAULIAS
Although African-violets are delicate flowers, they keep surprisingly well after cutting if properly conditioned. Under normal conditions, a cut stem will continue to hold some blossoms for about a week. This is a longer life than can be expected from many flowers popular for cutting, the sweetpea being one example. So do take the time and the trouble to condition your Saintpaulias before you start to arrange them. First of all, use a sharp knife to cut the blossoms from the plant. That woman we spoke of with her rusty old scissors will crush the stem, closing its pores so that water never can reach the flower.
Next, place the flowers in warm water in a warm room (never in a temperature below fifty degrees) and let them soak for two hours at least, overnight if possible. African-violets do not respond well to cool surroundings. Most authorities now agree that it is not necessary to plunge flowers in water up to their necks for proper conditioning since most flowers absorb water from the cut end. African-violets have many of the characteristics of the succulents, so soaking them in an inch of water will do the job.
The keeping quality of your Saintpaulias will vary. You will soon learn that the varieties which have more substance in the stem will hold up the longest. After picking the "violets," you will find that the first blossom may wilt in a day or so. Cut it off at once and the rest of the blossoms on the stem will open day by day. It is this that makes it possible to keep an arrangement for a week. Like any cut flower or foliage, of course, they will not keep well if placed on a radiator, in a sunny window, or in a draft.
African-violet leaves require a conditioning which differs slightly from the conditioning of the blossoms. Foliage bearing short hairs, like the "violet" leaf and geranium leaves, takes up water fast and will become waterlogged if left in water too long. Soak the leaves for no more than an hour and then put them in a cellophane bag until you are ready to make your arrangement.
KEEPING ARRANGEMENTS FRESH
Remember that, because flowers need oxygen, the water they are in must be kept fresh. There are several products on the market which help keep the water clean. However, my own feeling about the matter is that, if we keep the containers clean and change the water every day, the flowers will last about as long as under any other treatment. The slime which forms on the inside of the container comes from bacteria and this is what makes it essential to wash containers in hot soapy water after each use. I have heard what seem to me to be old wives’ tales about a great many things which will help keep cut flowers fresh. Some people recommend sugar which only speeds the forming of bacteria. Charcoal will help keep the water sweet but makes it dark. Aspirin does so little good that, if I were you, I’d save it for the headaches brought on by unsuccessful arrangements. I can hear you protesting, "Well! If I spend all this time making an arrangement, I'm certainly not going to tear it apart every day to change the water."
Be consoled, for this is not necessary. Take your arrangement to the sink, hold your hand on the back of it, tilt it, and let the water run off. Put the container under the spigot, let it refill, and back to the living room it goes. This takes little time and, if your mechanics have been properly done, the flowers will not fall out. Pick off any dead flowers at the time you change the water and your chore for the day is complete.
DRYING AFRICAN-VIOLETS
African-violets lend themselves well both to the process of drying and to dried arrangements. For the drying material, use either borax, white sand, cornmeal, or a combination of any two of these. Start with a large box over four inches in depth. Fill the bottom of the box with an inch of your drying material, gently lay the flower heads on it and, with a small stick, push it around the petals, leaving the stem sticking up in the air. Cover the blossoms with an inch of drying material.
The more quickly the flowers dry, the better they will hold their color, so some people put the box in a 2 50-degree oven, leaving the door open. Others simply leave the box in a fairly warm room.
It takes flowers from several days to several weeks to dry, depending upon the thickness of the petals. It is well to test them by brushing the sand away in a few days and touching the flower to see if the moisture is gone. It usually takes from five to ten days for African-violets to dry.
As soon as you think they are dry, remove all drying material with a soft brush and then you are ready to make an interesting arrangement. Use some grasses, a little dock, perhaps, or some lambs’ ear, and you will be delighted with the result.
 Plate 8. A four-inch arrangement in a salt dip with a brass hinge for background. African-violet Silver Lining and acacia.
1
A NEW APPROACH TO YOUR SAINTPAULIAS
Of the thousands of people who grow African-violets, only a few take advantage of the adaptability of these flowers for use in decorating. Distressed by the confinement of all this loveliness to pots and window sills, I began some time ago to experiment with the possibilities African-violets offer to the flower arranger. This book is a description of my discoveries and an attempt to entice those of you who love Saintpaulia to do some experimenting of your own.
African-violets as blooms or plants are perfect for use in many decorations. It is only a question of learning how to use them, and to begin, all you need is enough boldness to take your "violets" off the shelf. Don’t be discouraged by the neighbor who fixes you with a cold eye and says, "What are the rules for arranging Saintpaulias?" Nor by the superior aunt who says, "It’s an art, of course. All arts take years to learn."
Of course it’s an art but, in the beginning, look upon it as a folk art. All art began that way. The cave man, drawing for his own satisfaction on stony walls—who made the rules for him? Nobody. All art begins simply, by taking forms which nature gives us and arranging them into a design. Only please, let’s discover some design for African-violets newer than rows of pots on window sills!
Women are still saying to me, "Why not just cut my flowers and stick them in a vase? What’s wrong with that?"
Nothing, of course, except that sticking flowers in a vase is an automatic and uninteresting act whereas arranging flowers is an expression of personality. Once you have tried, however feebly,
to arrange some flowers into a design with a harmonious color effect, you have been for a time in tune with all artists, have known the urge to create something original and have a sense of fulfillment which follows self-expression in any form. With only flowers for material, you can paint a picture or tell a story. And the flowers you use, mark you, can be African-violets. It hasn’t been too many years since we had only horticultural shows. Gorgeous as some of the specimens were, even the growers began to tire of specimens in rows. Dahlia growers and other flower fanciers have asked me many times how their beauties can be brought in and used in the home, the church, the sick room. Man or Woman, a good grower who has taken a plant from seed to specimen bloom naturally wants to put it some place where it will show off to advantage. Only thus can the flower be enjoyed throughout its entire life. It is by this road, I am sure, that more and more men are coming to an appreciation of flower arranging.
And it is by this road, I hope, that African-violet lovers will come to an appreciation of arranging their jewels. To grow Saintpaulias, however rare or beautiful, is one thing. To enjoy arranging them is quite a different experience, something new and exciting.
If your first efforts are clumsy and not too successful, don’t worry. The flowers will wither and die in a few days and you can toss them out and start all over again. Suppose it had been an oil painting? There it would be, hanging on the wall year after year, for friends and relatives to moan about. The very fragility of flowers makes them ideal for experimental art.
One of the best things about a new interest, of course, is that it always leads to still another one. As it will be a new venture to arrange African-violets, so it will be a new venture to look for plant material that will be compatible with them. You will enjoy your Saintpaulias more if you build up a background for them, a frame to dramatize your prima donna. To find the foliage and plants for these backgrounds, acquire the seeing eye in your garden as well as on the highway. Collect some branches from your garden, starting perhaps by forcing some branches in the spring. This will be the beginning of a collection which you can continue practically all year. Dried materials are effective with "violets" so keep your eyes open for plants which can be dried and kept.
And now you’re ready. You have brought into the house some material you think will make a good background and you are prepared to sacrifice a few blooms from your African-violets. How do you start?
First of all, erase that frown. This is fun, remember? Stop worrying about the flower show. You're not ready for that yet, although you probably will be soon. Look around you for a moment. Let your home be your first guide. Is it formal or do you live a casual life here? Your "violets" will lend themselves to either type of surroundings but keep those surroundings in mind while you work. Are you a collector, perhaps of figurines? Later on I’m going to show you some pictures using collections of various things with the "violets." Meantime, have you a hobby of any sort? Could you work that into this first arrangement? Let yourself go and you will be surprised at the ideas which pop into your head. Maybe you would be more comfortable making a small beginning. If so, use only one or two blossoms and make a miniature arrangement for an end table.
Whatever you try to do, organize it into some sort of design, dramatize it in one way or another. I think most of us have an innate sense of good design, know by instinct an amazing number of "rules."
There isn't a person who doesn’t enjoy having flowers around unless it's hay fever season. And come to think of it, I never heard of anyone who was allergic to African-violets. So you’re ofi to a good start. There’s your first arrangement, finished and standing before you.
Now share it. Take it into the living room or to a sick friend—or to a well one for that matter! As you read on, you will learn more technique, but the basic technique of any art is the technique of sharing. The Chinese have been saying this beautifully for years. "Flowers leave part of their fragrance in the hand that bestows them."
~~~~~
3
CARE AND CONDITIONING
Flowers are living things and, as such, require understanding of their peculiar needs. It is not necessary that you be a biologist to learn how to care for flowers, but the purpose of all conditioning will be clearer if you understand what the blossom does while it is still on the plant.The petals of flowers exhale moisture which is supplied through the stem. As soon as the stem is cut, air starts to go up its pores. If the air has time to go any distance before the stem is put into water, the water is absorbed very slowly because of the air above it. When moisture is exhaled from the petals faster than it comes up the stems, the flowers begin to wilt. Hence the first rule of conditioning is to get cut flowers into water as fast as possible.
HARDENING SAINTPAULIAS
Although African-violets are delicate flowers, they keep surprisingly well after cutting if properly conditioned. Under normal conditions, a cut stem will continue to hold some blossoms for about a week. This is a longer life than can be expected from many flowers popular for cutting, the sweetpea being one example. So do take the time and the trouble to condition your Saintpaulias before you start to arrange them. First of all, use a sharp knife to cut the blossoms from the plant. That woman we spoke of with her rusty old scissors will crush the stem, closing its pores so that water never can reach the flower.
Next, place the flowers in warm water in a warm room (never in a temperature below fifty degrees) and let them soak for two hours at least, overnight if possible. African-violets do not respond well to cool surroundings. Most authorities now agree that it is not necessary to plunge flowers in water up to their necks for proper conditioning since most flowers absorb water from the cut end. African-violets have many of the characteristics of the succulents, so soaking them in an inch of water will do the job.
The keeping quality of your Saintpaulias will vary. You will soon learn that the varieties which have more substance in the stem will hold up the longest. After picking the "violets," you will find that the first blossom may wilt in a day or so. Cut it off at once and the rest of the blossoms on the stem will open day by day. It is this that makes it possible to keep an arrangement for a week. Like any cut flower or foliage, of course, they will not keep well if placed on a radiator, in a sunny window, or in a draft.
African-violet leaves require a conditioning which differs slightly from the conditioning of the blossoms. Foliage bearing short hairs, like the "violet" leaf and geranium leaves, takes up water fast and will become waterlogged if left in water too long. Soak the leaves for no more than an hour and then put them in a cellophane bag until you are ready to make your arrangement.
KEEPING ARRANGEMENTS FRESH
Remember that, because flowers need oxygen, the water they are in must be kept fresh. There are several products on the market which help keep the water clean. However, my own feeling about the matter is that, if we keep the containers clean and change the water every day, the flowers will last about as long as under any other treatment. The slime which forms on the inside of the container comes from bacteria and this is what makes it essential to wash containers in hot soapy water after each use. I have heard what seem to me to be old wives’ tales about a great many things which will help keep cut flowers fresh. Some people recommend sugar which only speeds the forming of bacteria. Charcoal will help keep the water sweet but makes it dark. Aspirin does so little good that, if I were you, I’d save it for the headaches brought on by unsuccessful arrangements. I can hear you protesting, "Well! If I spend all this time making an arrangement, I'm certainly not going to tear it apart every day to change the water."
Be consoled, for this is not necessary. Take your arrangement to the sink, hold your hand on the back of it, tilt it, and let the water run off. Put the container under the spigot, let it refill, and back to the living room it goes. This takes little time and, if your mechanics have been properly done, the flowers will not fall out. Pick off any dead flowers at the time you change the water and your chore for the day is complete.
DRYING AFRICAN-VIOLETS
African-violets lend themselves well both to the process of drying and to dried arrangements. For the drying material, use either borax, white sand, cornmeal, or a combination of any two of these. Start with a large box over four inches in depth. Fill the bottom of the box with an inch of your drying material, gently lay the flower heads on it and, with a small stick, push it around the petals, leaving the stem sticking up in the air. Cover the blossoms with an inch of drying material.
The more quickly the flowers dry, the better they will hold their color, so some people put the box in a 2 50-degree oven, leaving the door open. Others simply leave the box in a fairly warm room.
It takes flowers from several days to several weeks to dry, depending upon the thickness of the petals. It is well to test them by brushing the sand away in a few days and touching the flower to see if the moisture is gone. It usually takes from five to ten days for African-violets to dry.
As soon as you think they are dry, remove all drying material with a soft brush and then you are ready to make an interesting arrangement. Use some grasses, a little dock, perhaps, or some lambs’ ear, and you will be delighted with the result.

March 12, 2013

January 19, 2013
January 13, 2013
Mature Plant Care
I have received questions from people who purchased AV plants, new to African violets.... and the most common one is: "Why do you say 'Repot twice a year'?" I do think this is one of the best ways for novice growers to keep their plants happy and blooming.
Notice, I did not say: Pot UP! I said 'repot'. The purpose of this 'repotting' is to give the plant 'fresh' potting mix, and room to grow. A pot full of roots doesn't leave room for new growth, and I am a firm believer in the theory that root growth leads to top/crown growth, and that brings on the blossom stalks. (For some details on the 'root' subject, read the Class One notes of my House Plant Class.)
You do not have to put the plant in a LARGER pot, but please use a clean pot.
Here is a mature, 18 month old, plant of Ness' Fantasy Gold. This variety tends to grow leggy... the leaf stems are quite long. This particular plant has been pretty well shaped, with healthy leaves! But it needed repotting. The date on the labels said it had been repotted in August, 2012.
'Before' photo:

 I took several layers of leaves off.... and then took the plant out of the pot. I rubbed off much of the soil mix, expecially at the surface of the root ball. Then, I held it in the new pot (the same size as the old pot). I wanted to bury the 'bare trunk' which appeared after I took off the lower older leaves. So, I rubbed, vigorously, more dirt off the bottom of the root ball. You can simply cut off a half inch to inch of the bottom, but the soil mix was loose, and there didn't seem to be many roots in the bottom bit of the rootball, so I just rubbed the excess soil off.
Then I set it in the new pot, filled in with fresh soil mix, tapping on the table to settle the dirt into the open spots in the rootball. I topped off the pot with a layer of new mix, then pressed down slightly. Please do NOT pack the soil mix when repotting African violets. Press firmly, but not too much!
Here is an 'after' photo.

I did not remove flower stalks.... this is not a 'grown to show' plant, and I can enjoy the blooms. The purpose of removing flower stalks is to put the plant's energy into growing foliage, and in this case, the plant has ample foliage, and it will bloom nicely while/after it is growng new roots into the fresh soil mix in the new pot!
Note, we made room for new potting mix in the same sized pot by reducing both the top and bottom size of the plant. Personally, I would not cut off part of the root ball without also taking off a few leaves. Remember, the roots supply the leaves with moisture... a reduced root system might not be able to keep a large crown healthy.
Your first impulse might have been to put the violet into a pot larger than the one it was in. Many times you can do this... and you could have done so in this case.
If the plant is younger than a year, and in a pot smaller than 4 inches, I would 'pot up' into a larger pot. If the plant is in a 4 to 6 inch pot, I would recommend potting into the same size pot, as I did above.
(Remember, pot size depends upon the type of soil mix, the way you water, how much attention you give your violets, your house conditions, and your past experience. If your violets like what you are doing, don't change it just because I do something different!)
January 10, 2013
Leaf Pruning Babies!
Many people mention root pruning (cutting off the bottom of the root ball when repotting). Growers tending show violets will train leaves to put them in the right position, disbud (remove buds and blossom stalks), and prune to remove leaves with damage or to give space for the center leaves to grow.
I leaf prune very small babies! I did it without thinking... and was nearly done with the tray of babies this morning when I thought: I wonder if anyone knows about this this? I consider it very important, and should explain exactly what I mean.
Why take tiny leaves off very young plants with only a few leaves to begin with!!!????
 Left are two young babies of Ma's Second Thoughts.
They were very small but strong, with lots of roots, and I want to hurry them up, and the mama leaf was removed when I had the mildew episode, so I gently pulled them apart.
Left are two young babies of Ma's Second Thoughts.
They were very small but strong, with lots of roots, and I want to hurry them up, and the mama leaf was removed when I had the mildew episode, so I gently pulled them apart.
Notice the leaf hanging off to the right on the plant on the right.
Notice the leaf on the left on the plant on the left.
I removed both of these, because they were below the main crown/growing center. The other leaves of each baby basically came out together with each other.
Yes, I know the leaves on a mature African violet come out at different levels along the trunk of the plant.
I leaf prune very small babies! I did it without thinking... and was nearly done with the tray of babies this morning when I thought: I wonder if anyone knows about this this? I consider it very important, and should explain exactly what I mean.
Why take tiny leaves off very young plants with only a few leaves to begin with!!!????
 Left are two young babies of Ma's Second Thoughts.
 Notice the leaf hanging off to the right on the plant on the right.
Notice the leaf on the left on the plant on the left.
I removed both of these, because they were below the main crown/growing center. The other leaves of each baby basically came out together with each other.
Yes, I know the leaves on a mature African violet come out at different levels along the trunk of the plant.
However, in this case, if you set the baby in the soil mix at a level even with the main growing point where most of the leaves came out, you would be burying most of the bottom leaf's stem and the point where it comes out of the baby's trunk. This would most definitely cause more suckering, or even that leaf producing babies at the point where it meets the main trunk, or along the stem. I almost always have terrible and prolonged troubles with suckering when I bury the base of a leaf!
If I set the baby in the soil mix at a level where the bottom leaf comes off the trunk, you have already given the baby an 'old lady' trunk. New leaves won't come from this bare trunk... and the next time you potted up this plant, you would end up removing this leaf and burying the trunk. Plus, I have seen suckering in this situation also.
Taking Babies From Mama Leaf -- How To
Here is how I transplant babies from an African violet 'mama' leaf. Note, I say 'transplanting' babies from mama leaf, and I say 'potting up' babies when they have outgrown this first pot and need to be moved 'up' to a larger pot. Some say pota-toe, some say pat-tato.
I have found one good way to start and that makes seperating and planting a tray of babies quick and easy. Start right and you will end up happy.
 Left, is a photo of my table this morning. At the top of the photo, is my tray of mama leaves, as well as two square cell packs on the table.
On the right is a sheet of labels and marker.
I just potted up two babies. The 'discard' pile is near the tip of the pen.
Out of sight on the left, is a green Rubbermaid tub of potting mix. Out of sight on the right, is a tray waiting for the baby pots.
 Here is a mama leaf of Splendiferous, with the clump of babies.
 Just 'tease' apart the clump. First I pull the mama leaf away, and the two smallest not yet mature babies came with her. There are six other babies.
 The two smallest, not yet mature babies, came with her (on right). These I would discard unless the leaf was a rare or expensive one.
In the middle, are three small babies, and the largest babies are at the bottom.
The two smallest, not yet mature babies, came with her (on right). These I would discard unless the leaf was a rare or expensive one.
In the middle, are three small babies, and the largest babies are at the bottom.
The baby on the bottom right has the best potential for shape, root size, and number of leaves. It also was the first to reach this size, and it may also have a bit extra vitality.
I had decided to limit the number of babies so had chosen four as a good number of each variety, as four pots fit across the tray, making one row for each variety. :)
I have found one good way to start and that makes seperating and planting a tray of babies quick and easy. Start right and you will end up happy.
- Begin with labels and a waterproof marker. Use labels or tape pieces with permanent adhesive.
- Have small pots in many sizes stacked right there. It is easy to use a pot that is too small or too large when there are lots of pots there, but none of the correct size.
PUTTING THE BABIES IN THE RIGHT SIZE POT IS important.
I like to use a pot with the volume of soil mix about three times the amount of roots. You can just guess... it isn't an exact science. Don't go by the size of the crown/top.
*** If you put small babies in small pots, and larger babies with larger root systems in larger pots, you will be able to just pour water in the tray and leave them drink up for a half hour, without worry about over or under watering. The larger amount of soil mix will soak up more water, which is needed by the larger baby, and the smaller pots will soak up less and you will be less likely to drown the smaller, slower growing babies. This way I can put many babies of different sizes, varieties, and rate of growth in the same tray, and for the next two months, they will not need individual attention! - Have water, with fertilizer/additives, ready. Do you have enough soil mix? Have a clean tray with dome standing ready.
 Left, is a photo of my table this morning. At the top of the photo, is my tray of mama leaves, as well as two square cell packs on the table.
On the right is a sheet of labels and marker.
I just potted up two babies. The 'discard' pile is near the tip of the pen.
Out of sight on the left, is a green Rubbermaid tub of potting mix. Out of sight on the right, is a tray waiting for the baby pots.
 Here is a mama leaf of Splendiferous, with the clump of babies.
  Just 'tease' apart the clump. First I pull the mama leaf away, and the two smallest not yet mature babies came with her. There are six other babies.
 The two smallest, not yet mature babies, came with her (on right). These I would discard unless the leaf was a rare or expensive one.
The baby on the bottom right has the best potential for shape, root size, and number of leaves. It also was the first to reach this size, and it may also have a bit extra vitality.
I had decided to limit the number of babies so had chosen four as a good number of each variety, as four pots fit across the tray, making one row for each variety. :)
Of the above babies, I chose the two on the right on the bottom row. and the two on left of the top row. NOTE: The baby on the left on the bottom, while having five leaves, had a funny looking crown. It may have grown up to grow normally, but since I had the two strong ones above. Although smaller, they were naturally better shaped. :)
Sort of feel like I am an over-demanding soccer mother, expecting them to do better than normal even when young! :)
When the tray was full, I soaked the pots with water containing a small amount of Neptune's Harvest Seaweed Plant Food, and a dilute measure of Jack's Classic 20-20-20.
I have been re-reading AVMagazines from 2005 and 7, and at that time, it seemed everyone was using seaweed extract when rooting leaves and planting babies. So, I decided to try it on this tray!
P.S. I did measure the Seaweed and the Jack's Classic! And wrote it down. If it works well, I want to be able to duplicate it! If it does harm, the amounts may help discover why!
January 9, 2013
Experiment # 1b (small pots) -- Soil versus Soil-less JAN UPDATE
Updating Experiment
# 1a and #1b -- Soil versus Soil-less :
Comments:The two larger pots with Amethyst plants have been 'exiled' to the windowsill, and they are leggy and not 'improved'. I am finding it hard to keep the clay pot watered, although even when the loam 'dirt' is dry, the plant does not wilt. I have had the plant in my mix and the plastic pot wilt slightly before I noticed they needed watering. They should have better care to 'make them beautiful', but this is the 'hard test' of neglect! :)
The smaller pots have been on the light stand, on the experiments shelf, and have been much more cared-for, pampered even.
I have been surprised that the Miracle Gro AV
soil mix has not done better, considering the hype it has gotten, and the so-so number of people who use it and love it.
The pot with 100% dirt had done very well, considering it seems to always need watering.
When I do add water to these three pots, my mix takes up a slightly larger amount of water, but the top growth is slightly larger, so I guess that could be explained.
The two pots on the right were nearly identical when I began this experiment, MAYBE the root system of the middle plant was slightly, very slightly larger. This may account for the faster growth, or is it the 'acclaimed BEST' AV mix formula???
Time will tell.
The goal for this experiment was to see which potting mix was conductive to better/faster/nicer growth. These three plants have received attention and proper care, and it will be interesting to see if this trend continues during the next month!
 |
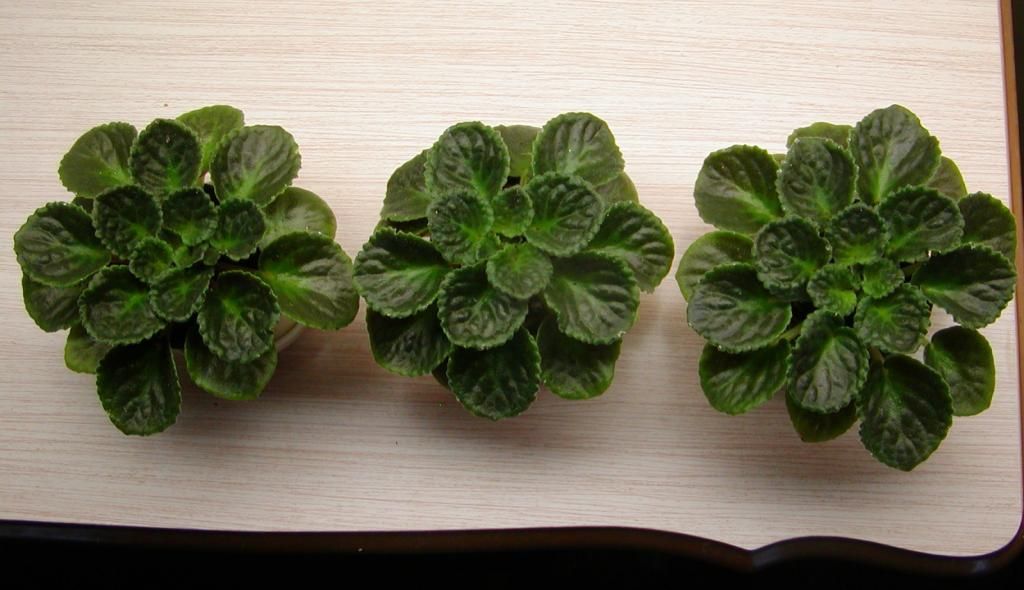
| #1b three Ness' Cranberry Lace plants in small pots 12/6/2012: Top Left: Miracle Gro AV soil Middle Right: 100% garden loam in clay pot Bottom: my mix |
The smaller pots have been on the light stand, on the experiments shelf, and have been much more cared-for, pampered even.
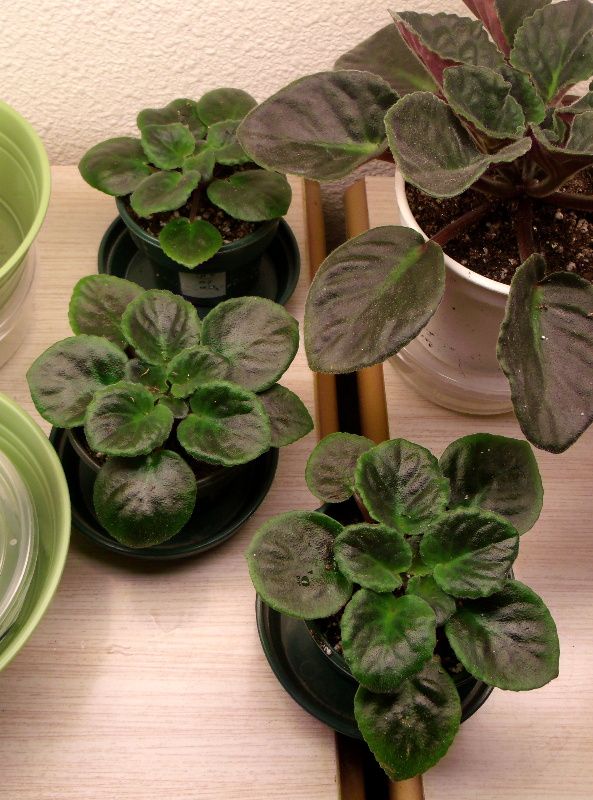
 |
| #1 b three Ness' Cranberry Lace plants 1/9/2013: Left: Miracle Gro AV soil Middle my mix Right: garden loam in clay pot |
soil mix has not done better, considering the hype it has gotten, and the so-so number of people who use it and love it.
The pot with 100% dirt had done very well, considering it seems to always need watering.
When I do add water to these three pots, my mix takes up a slightly larger amount of water, but the top growth is slightly larger, so I guess that could be explained.
The two pots on the right were nearly identical when I began this experiment, MAYBE the root system of the middle plant was slightly, very slightly larger. This may account for the faster growth, or is it the 'acclaimed BEST' AV mix formula???
Time will tell.
The goal for this experiment was to see which potting mix was conductive to better/faster/nicer growth. These three plants have received attention and proper care, and it will be interesting to see if this trend continues during the next month!
Experiment # 2 -- Watering Methods JAN UPDATE
Updating Experiment
# 2 -- Watering Methods :
Comment:
The camera angle (taken from front) is misleading: All four plants are very close to the same size. I had started with the two on wicks slightly larger and they now MAY??? be slightly smaller????
I had expected the pot sitting in water 5 or 6 days out of 7 to be too wet and by the 'finger test', it was too wet. I expected it to rot! Yet, it seems to be doing fine. They all have approx the same number of leaves but, if I had to choose, I would say the leaves are larger on the contant-level 'real' Texas Style. ??? !!! :)
There are buds on the two wicked plants, but they were slightly larger at the beginning, so blooming time will not be counted in this experiment.
The goal of this experiment was to see if any of these methods of watering would make it easier and quicker for me to maintain a larger number of plants through the busy summer months.
I expected the wicked methods to be easiest, and by a very small degree, they are. However, the constant-level TS has been very easy: just add water whenever I notice the saucer is empty or nearly so!
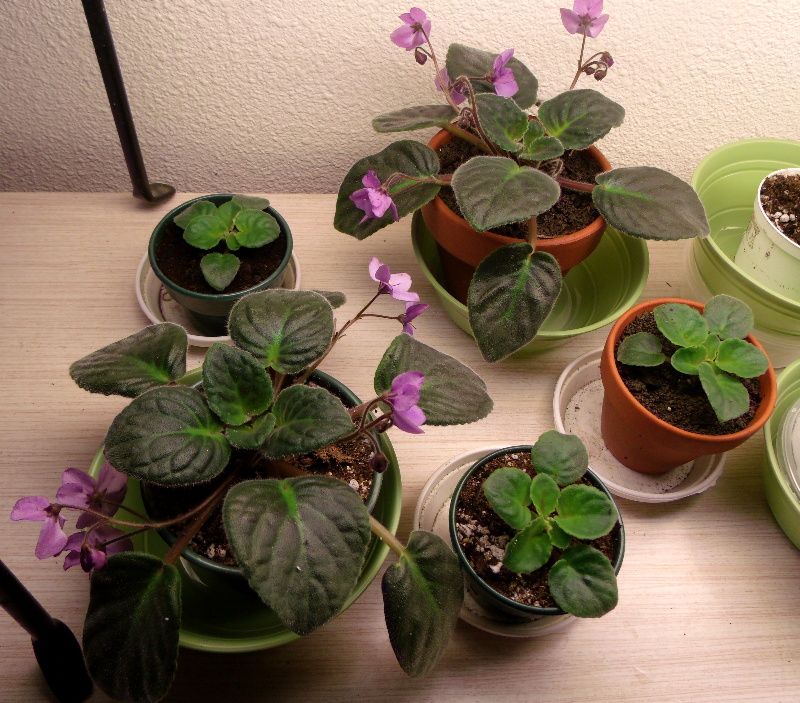
 |
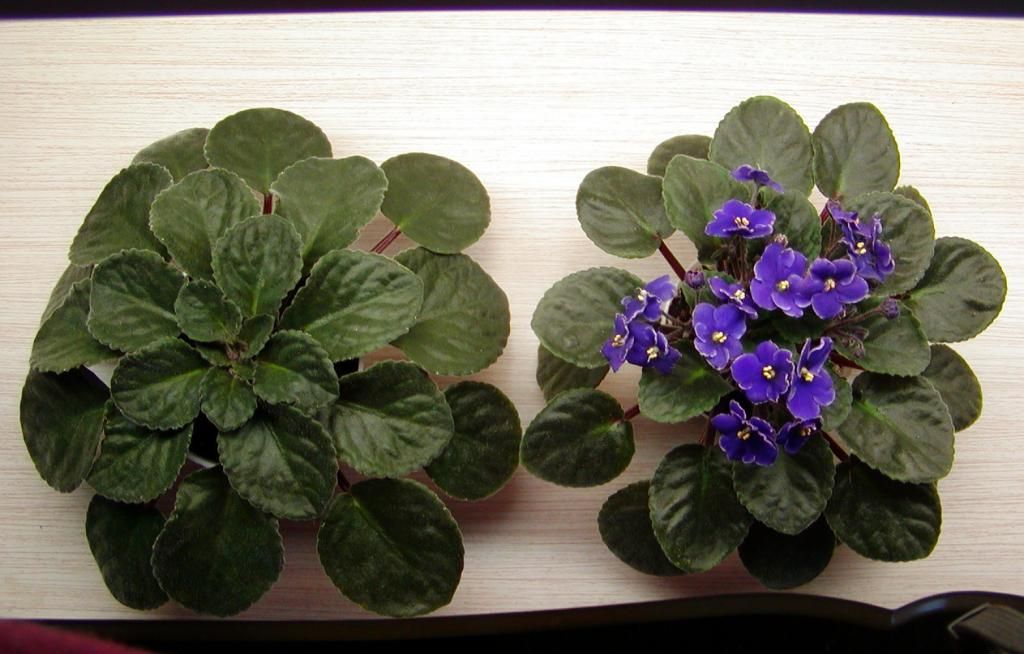
| No-Name Double Pink plants on 12/6/2012: Top Left: Saucer watered *** Top Right: constant-level Texas Style Bottom Left: felt wick *** Bottom Right: yarn wick |
 |
| No-Name Double Pink plants on 1/9/2013: Left Top: saucer watered *** Left Bottom: constant-level Texas Style Right Top: felt wick *** Right Bottom: yarn wick |
The camera angle (taken from front) is misleading: All four plants are very close to the same size. I had started with the two on wicks slightly larger and they now MAY??? be slightly smaller????
I had expected the pot sitting in water 5 or 6 days out of 7 to be too wet and by the 'finger test', it was too wet. I expected it to rot! Yet, it seems to be doing fine. They all have approx the same number of leaves but, if I had to choose, I would say the leaves are larger on the contant-level 'real' Texas Style. ??? !!! :)
There are buds on the two wicked plants, but they were slightly larger at the beginning, so blooming time will not be counted in this experiment.
The goal of this experiment was to see if any of these methods of watering would make it easier and quicker for me to maintain a larger number of plants through the busy summer months.
I expected the wicked methods to be easiest, and by a very small degree, they are. However, the constant-level TS has been very easy: just add water whenever I notice the saucer is empty or nearly so!
Experiment #4 -- Soil Mix Additions JAN UPDATE
Updating Experiment # 4 -- Soil Mix Additions
Comments: Both mixes with additives are doing better than my mix plain. In this case, the pot with loam added has more leaves and the pot with the soil conditioner have darker colored leaves.
Edited:
The goal for this experiment was to determine if adding some 'live bacteria and organisams' to my 'artificial' mix would give the plants some advantage.. maybe better able to absorb/use fertilizers, or keep soil fresh and neutral, etc.
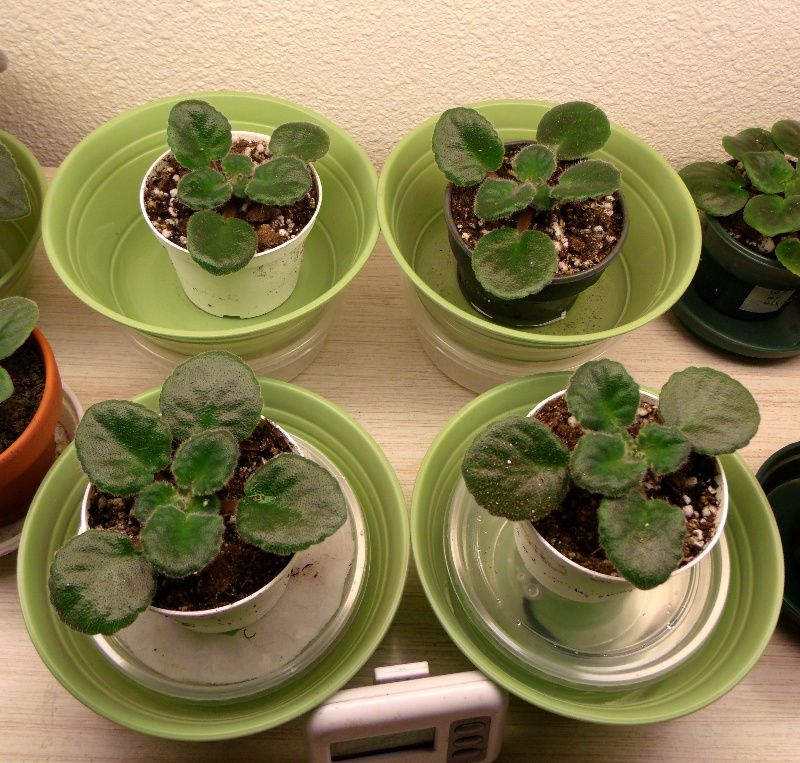
 |
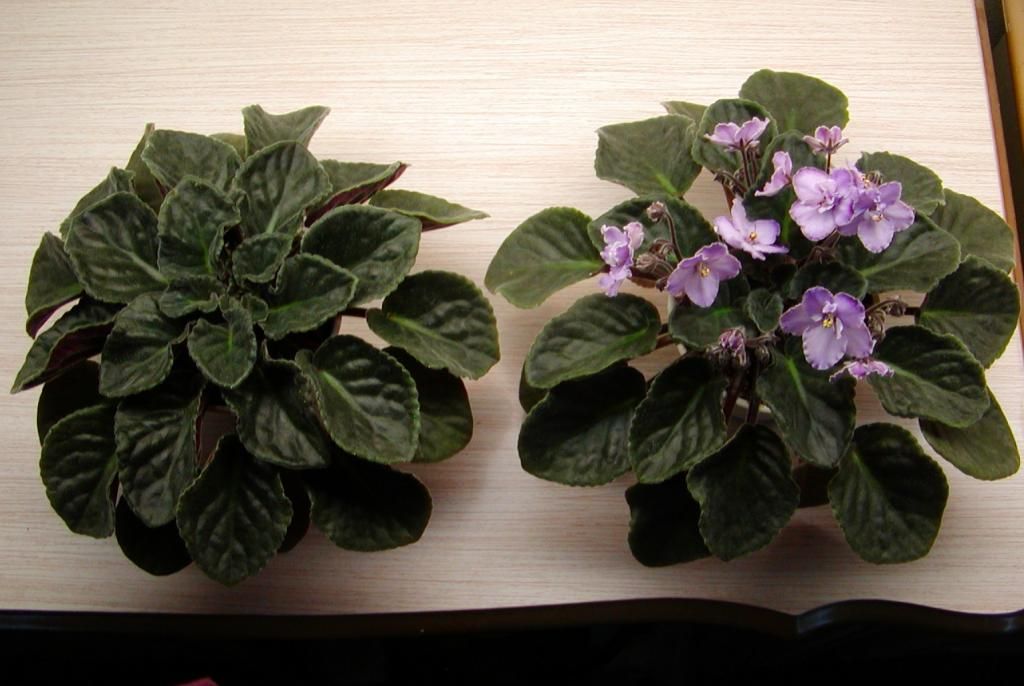
| Optimara Bora Bora plants on 12/6/2012 Top: my mix with Happy Frog Soil Conditioner Middle: my mix Bottom: 1/2 my mix, 1/2 garden loam |
 |
| O. Bora Bora plants on 1/9/2013 Right: my mix with Happy Frog Soil Conditioner Middle: my mix Left: 1/2 my mix, 1/2 garden loam |
Comments: Both mixes with additives are doing better than my mix plain. In this case, the pot with loam added has more leaves and the pot with the soil conditioner have darker colored leaves.
Edited:
The goal for this experiment was to determine if adding some 'live bacteria and organisams' to my 'artificial' mix would give the plants some advantage.. maybe better able to absorb/use fertilizers, or keep soil fresh and neutral, etc.
January 6, 2013
Update on MILDEW
Update on the mildew problem:
As expected, correcting the cause was the saving of the situation!
But from past experiences, I knew that simply creating a good mildew-free environment wouldn't completely eliminate the problem since the powdery mildew spores were still floating around.
So, I misted the Lysol over most of the growing areas every three days. I did mist my 'mama' mature and blooming plants once, very lightly, after removing all open blossoms that would have the most probability of having unseen mildew on the backsides. The leaf trays and streps also were misted.
The tray of babies that was so badly infected/affected were left so that I could see what the milk/clove oil/water combo did. I sure hated to take a chance, but since I have been in an 'experiement' mood this winter (thanks again, Laurie!) I just had to.
Ten days later, and there was no return of mildew.. and yes, I did put on my glasses! In the past, it often returned in five days to one week. So on the eleventh day, I misted the leaf tray and the Maverick's Faded Jeans plant with the Lysol.
The mildew did leave it's 'mark'... some of the leaves on plants most often touched developed brown marks or brownish tints. I read somewhere that the mildew actually enters the leaf and feeds on the plant's cells. Kill the mildew and it will stop doing more damage, but any cell damaged will die or show stress.
Anyway, now that my canary hen hatched several baby chicks, I have to be careful with the Lysol spray... the smell drifted throughout our house since several of my violet stands are in the open living areas. Cautions include dangers to household pets, including birds. So, I will continue to mist the sales plants with the Lysol on a schedule, in another room with an exhaust fan going and the door closed. But my personal plants in our living areas will get the milk treatment.
Subscribe to:
Posts (Atom)