
January 19, 2013
January 13, 2013
Mature Plant Care
I have received questions from people who purchased AV plants, new to African violets.... and the most common one is: "Why do you say 'Repot twice a year'?" I do think this is one of the best ways for novice growers to keep their plants happy and blooming.
Notice, I did not say: Pot UP! I said 'repot'. The purpose of this 'repotting' is to give the plant 'fresh' potting mix, and room to grow. A pot full of roots doesn't leave room for new growth, and I am a firm believer in the theory that root growth leads to top/crown growth, and that brings on the blossom stalks. (For some details on the 'root' subject, read the Class One notes of my House Plant Class.)
You do not have to put the plant in a LARGER pot, but please use a clean pot.
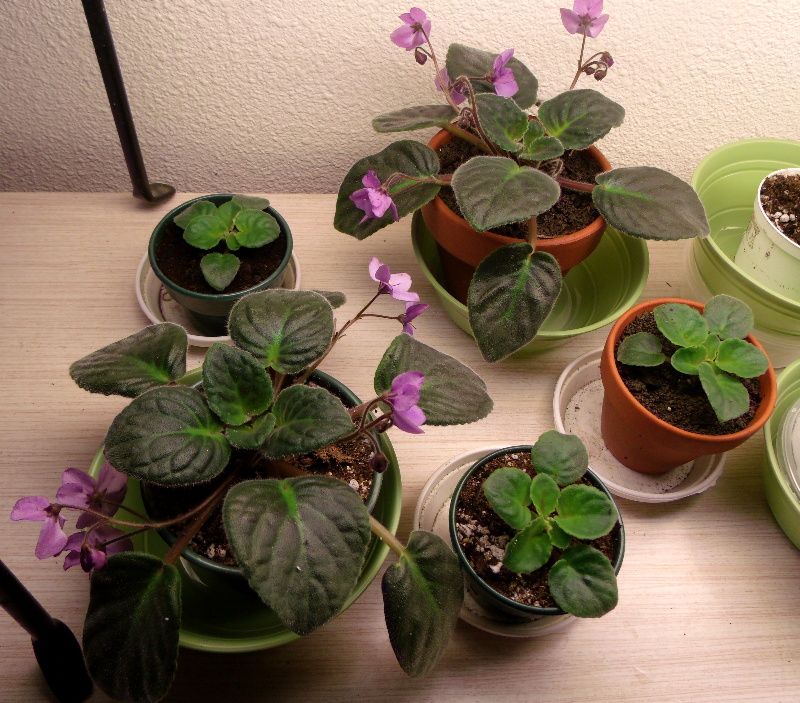
Here is a mature, 18 month old, plant of Ness' Fantasy Gold. This variety tends to grow leggy... the leaf stems are quite long. This particular plant has been pretty well shaped, with healthy leaves! But it needed repotting. The date on the labels said it had been repotted in August, 2012.
'Before' photo:

 I took several layers of leaves off.... and then took the plant out of the pot. I rubbed off much of the soil mix, expecially at the surface of the root ball. Then, I held it in the new pot (the same size as the old pot). I wanted to bury the 'bare trunk' which appeared after I took off the lower older leaves. So, I rubbed, vigorously, more dirt off the bottom of the root ball. You can simply cut off a half inch to inch of the bottom, but the soil mix was loose, and there didn't seem to be many roots in the bottom bit of the rootball, so I just rubbed the excess soil off.
Then I set it in the new pot, filled in with fresh soil mix, tapping on the table to settle the dirt into the open spots in the rootball. I topped off the pot with a layer of new mix, then pressed down slightly. Please do NOT pack the soil mix when repotting African violets. Press firmly, but not too much!
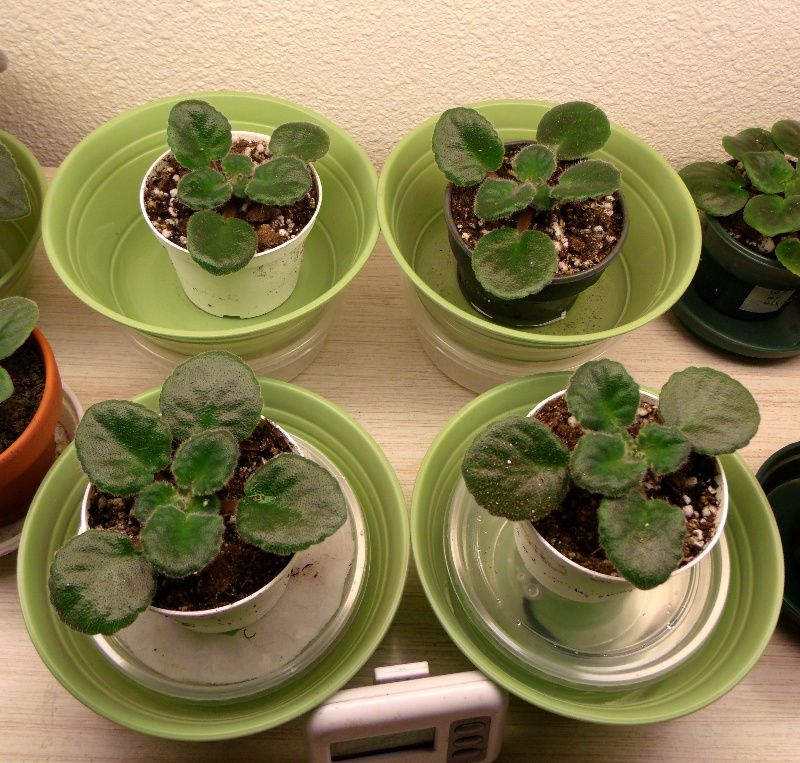
Here is an 'after' photo.

I did not remove flower stalks.... this is not a 'grown to show' plant, and I can enjoy the blooms. The purpose of removing flower stalks is to put the plant's energy into growing foliage, and in this case, the plant has ample foliage, and it will bloom nicely while/after it is growng new roots into the fresh soil mix in the new pot!
Note, we made room for new potting mix in the same sized pot by reducing both the top and bottom size of the plant. Personally, I would not cut off part of the root ball without also taking off a few leaves. Remember, the roots supply the leaves with moisture... a reduced root system might not be able to keep a large crown healthy.
Your first impulse might have been to put the violet into a pot larger than the one it was in. Many times you can do this... and you could have done so in this case.
If the plant is younger than a year, and in a pot smaller than 4 inches, I would 'pot up' into a larger pot. If the plant is in a 4 to 6 inch pot, I would recommend potting into the same size pot, as I did above.
(Remember, pot size depends upon the type of soil mix, the way you water, how much attention you give your violets, your house conditions, and your past experience. If your violets like what you are doing, don't change it just because I do something different!)
Notice, I did not say: Pot UP! I said 'repot'. The purpose of this 'repotting' is to give the plant 'fresh' potting mix, and room to grow. A pot full of roots doesn't leave room for new growth, and I am a firm believer in the theory that root growth leads to top/crown growth, and that brings on the blossom stalks. (For some details on the 'root' subject, read the Class One notes of my House Plant Class.)
You do not have to put the plant in a LARGER pot, but please use a clean pot.
Here is a mature, 18 month old, plant of Ness' Fantasy Gold. This variety tends to grow leggy... the leaf stems are quite long. This particular plant has been pretty well shaped, with healthy leaves! But it needed repotting. The date on the labels said it had been repotted in August, 2012.
'Before' photo:

 I took several layers of leaves off.... and then took the plant out of the pot. I rubbed off much of the soil mix, expecially at the surface of the root ball. Then, I held it in the new pot (the same size as the old pot). I wanted to bury the 'bare trunk' which appeared after I took off the lower older leaves. So, I rubbed, vigorously, more dirt off the bottom of the root ball. You can simply cut off a half inch to inch of the bottom, but the soil mix was loose, and there didn't seem to be many roots in the bottom bit of the rootball, so I just rubbed the excess soil off.
Then I set it in the new pot, filled in with fresh soil mix, tapping on the table to settle the dirt into the open spots in the rootball. I topped off the pot with a layer of new mix, then pressed down slightly. Please do NOT pack the soil mix when repotting African violets. Press firmly, but not too much!
Here is an 'after' photo.

I did not remove flower stalks.... this is not a 'grown to show' plant, and I can enjoy the blooms. The purpose of removing flower stalks is to put the plant's energy into growing foliage, and in this case, the plant has ample foliage, and it will bloom nicely while/after it is growng new roots into the fresh soil mix in the new pot!
Note, we made room for new potting mix in the same sized pot by reducing both the top and bottom size of the plant. Personally, I would not cut off part of the root ball without also taking off a few leaves. Remember, the roots supply the leaves with moisture... a reduced root system might not be able to keep a large crown healthy.
Your first impulse might have been to put the violet into a pot larger than the one it was in. Many times you can do this... and you could have done so in this case.
If the plant is younger than a year, and in a pot smaller than 4 inches, I would 'pot up' into a larger pot. If the plant is in a 4 to 6 inch pot, I would recommend potting into the same size pot, as I did above.
(Remember, pot size depends upon the type of soil mix, the way you water, how much attention you give your violets, your house conditions, and your past experience. If your violets like what you are doing, don't change it just because I do something different!)
January 10, 2013
Leaf Pruning Babies!
Many people mention root pruning (cutting off the bottom of the root ball when repotting). Growers tending show violets will train leaves to put them in the right position, disbud (remove buds and blossom stalks), and prune to remove leaves with damage or to give space for the center leaves to grow.
I leaf prune very small babies! I did it without thinking... and was nearly done with the tray of babies this morning when I thought: I wonder if anyone knows about this this? I consider it very important, and should explain exactly what I mean.
Why take tiny leaves off very young plants with only a few leaves to begin with!!!????
 Left are two young babies of Ma's Second Thoughts.
They were very small but strong, with lots of roots, and I want to hurry them up, and the mama leaf was removed when I had the mildew episode, so I gently pulled them apart.
Left are two young babies of Ma's Second Thoughts.
They were very small but strong, with lots of roots, and I want to hurry them up, and the mama leaf was removed when I had the mildew episode, so I gently pulled them apart.
Notice the leaf hanging off to the right on the plant on the right.
Notice the leaf on the left on the plant on the left.
I removed both of these, because they were below the main crown/growing center. The other leaves of each baby basically came out together with each other.
Yes, I know the leaves on a mature African violet come out at different levels along the trunk of the plant.
I leaf prune very small babies! I did it without thinking... and was nearly done with the tray of babies this morning when I thought: I wonder if anyone knows about this this? I consider it very important, and should explain exactly what I mean.
Why take tiny leaves off very young plants with only a few leaves to begin with!!!????
 Left are two young babies of Ma's Second Thoughts.
 Notice the leaf hanging off to the right on the plant on the right.
Notice the leaf on the left on the plant on the left.
I removed both of these, because they were below the main crown/growing center. The other leaves of each baby basically came out together with each other.
Yes, I know the leaves on a mature African violet come out at different levels along the trunk of the plant.
However, in this case, if you set the baby in the soil mix at a level even with the main growing point where most of the leaves came out, you would be burying most of the bottom leaf's stem and the point where it comes out of the baby's trunk. This would most definitely cause more suckering, or even that leaf producing babies at the point where it meets the main trunk, or along the stem. I almost always have terrible and prolonged troubles with suckering when I bury the base of a leaf!
If I set the baby in the soil mix at a level where the bottom leaf comes off the trunk, you have already given the baby an 'old lady' trunk. New leaves won't come from this bare trunk... and the next time you potted up this plant, you would end up removing this leaf and burying the trunk. Plus, I have seen suckering in this situation also.
Taking Babies From Mama Leaf -- How To
Here is how I transplant babies from an African violet 'mama' leaf. Note, I say 'transplanting' babies from mama leaf, and I say 'potting up' babies when they have outgrown this first pot and need to be moved 'up' to a larger pot. Some say pota-toe, some say pat-tato.
I have found one good way to start and that makes seperating and planting a tray of babies quick and easy. Start right and you will end up happy.
 Left, is a photo of my table this morning. At the top of the photo, is my tray of mama leaves, as well as two square cell packs on the table.
On the right is a sheet of labels and marker.
I just potted up two babies. The 'discard' pile is near the tip of the pen.
Out of sight on the left, is a green Rubbermaid tub of potting mix. Out of sight on the right, is a tray waiting for the baby pots.
 Here is a mama leaf of Splendiferous, with the clump of babies.
 Just 'tease' apart the clump. First I pull the mama leaf away, and the two smallest not yet mature babies came with her. There are six other babies.
 The two smallest, not yet mature babies, came with her (on right). These I would discard unless the leaf was a rare or expensive one.
In the middle, are three small babies, and the largest babies are at the bottom.
The two smallest, not yet mature babies, came with her (on right). These I would discard unless the leaf was a rare or expensive one.
In the middle, are three small babies, and the largest babies are at the bottom.
The baby on the bottom right has the best potential for shape, root size, and number of leaves. It also was the first to reach this size, and it may also have a bit extra vitality.
I had decided to limit the number of babies so had chosen four as a good number of each variety, as four pots fit across the tray, making one row for each variety. :)
I have found one good way to start and that makes seperating and planting a tray of babies quick and easy. Start right and you will end up happy.
- Begin with labels and a waterproof marker. Use labels or tape pieces with permanent adhesive.
- Have small pots in many sizes stacked right there. It is easy to use a pot that is too small or too large when there are lots of pots there, but none of the correct size.
PUTTING THE BABIES IN THE RIGHT SIZE POT IS important.
I like to use a pot with the volume of soil mix about three times the amount of roots. You can just guess... it isn't an exact science. Don't go by the size of the crown/top.
*** If you put small babies in small pots, and larger babies with larger root systems in larger pots, you will be able to just pour water in the tray and leave them drink up for a half hour, without worry about over or under watering. The larger amount of soil mix will soak up more water, which is needed by the larger baby, and the smaller pots will soak up less and you will be less likely to drown the smaller, slower growing babies. This way I can put many babies of different sizes, varieties, and rate of growth in the same tray, and for the next two months, they will not need individual attention! - Have water, with fertilizer/additives, ready. Do you have enough soil mix? Have a clean tray with dome standing ready.
 Left, is a photo of my table this morning. At the top of the photo, is my tray of mama leaves, as well as two square cell packs on the table.
On the right is a sheet of labels and marker.
I just potted up two babies. The 'discard' pile is near the tip of the pen.
Out of sight on the left, is a green Rubbermaid tub of potting mix. Out of sight on the right, is a tray waiting for the baby pots.
 Here is a mama leaf of Splendiferous, with the clump of babies.
  Just 'tease' apart the clump. First I pull the mama leaf away, and the two smallest not yet mature babies came with her. There are six other babies.
 The two smallest, not yet mature babies, came with her (on right). These I would discard unless the leaf was a rare or expensive one.
The baby on the bottom right has the best potential for shape, root size, and number of leaves. It also was the first to reach this size, and it may also have a bit extra vitality.
I had decided to limit the number of babies so had chosen four as a good number of each variety, as four pots fit across the tray, making one row for each variety. :)
Of the above babies, I chose the two on the right on the bottom row. and the two on left of the top row. NOTE: The baby on the left on the bottom, while having five leaves, had a funny looking crown. It may have grown up to grow normally, but since I had the two strong ones above. Although smaller, they were naturally better shaped. :)
Sort of feel like I am an over-demanding soccer mother, expecting them to do better than normal even when young! :)
When the tray was full, I soaked the pots with water containing a small amount of Neptune's Harvest Seaweed Plant Food, and a dilute measure of Jack's Classic 20-20-20.
I have been re-reading AVMagazines from 2005 and 7, and at that time, it seemed everyone was using seaweed extract when rooting leaves and planting babies. So, I decided to try it on this tray!
P.S. I did measure the Seaweed and the Jack's Classic! And wrote it down. If it works well, I want to be able to duplicate it! If it does harm, the amounts may help discover why!
January 9, 2013
Experiment # 1b (small pots) -- Soil versus Soil-less JAN UPDATE
Updating Experiment
# 1a and #1b -- Soil versus Soil-less :
Comments:The two larger pots with Amethyst plants have been 'exiled' to the windowsill, and they are leggy and not 'improved'. I am finding it hard to keep the clay pot watered, although even when the loam 'dirt' is dry, the plant does not wilt. I have had the plant in my mix and the plastic pot wilt slightly before I noticed they needed watering. They should have better care to 'make them beautiful', but this is the 'hard test' of neglect! :)
The smaller pots have been on the light stand, on the experiments shelf, and have been much more cared-for, pampered even.
I have been surprised that the Miracle Gro AV
soil mix has not done better, considering the hype it has gotten, and the so-so number of people who use it and love it.
The pot with 100% dirt had done very well, considering it seems to always need watering.
When I do add water to these three pots, my mix takes up a slightly larger amount of water, but the top growth is slightly larger, so I guess that could be explained.
The two pots on the right were nearly identical when I began this experiment, MAYBE the root system of the middle plant was slightly, very slightly larger. This may account for the faster growth, or is it the 'acclaimed BEST' AV mix formula???
Time will tell.
The goal for this experiment was to see which potting mix was conductive to better/faster/nicer growth. These three plants have received attention and proper care, and it will be interesting to see if this trend continues during the next month!
 |
| #1b three Ness' Cranberry Lace plants in small pots 12/6/2012: Top Left: Miracle Gro AV soil Middle Right: 100% garden loam in clay pot Bottom: my mix |
The smaller pots have been on the light stand, on the experiments shelf, and have been much more cared-for, pampered even.
 |
| #1 b three Ness' Cranberry Lace plants 1/9/2013: Left: Miracle Gro AV soil Middle my mix Right: garden loam in clay pot |
soil mix has not done better, considering the hype it has gotten, and the so-so number of people who use it and love it.
The pot with 100% dirt had done very well, considering it seems to always need watering.
When I do add water to these three pots, my mix takes up a slightly larger amount of water, but the top growth is slightly larger, so I guess that could be explained.
The two pots on the right were nearly identical when I began this experiment, MAYBE the root system of the middle plant was slightly, very slightly larger. This may account for the faster growth, or is it the 'acclaimed BEST' AV mix formula???
Time will tell.
The goal for this experiment was to see which potting mix was conductive to better/faster/nicer growth. These three plants have received attention and proper care, and it will be interesting to see if this trend continues during the next month!
Experiment # 2 -- Watering Methods JAN UPDATE
Updating Experiment
# 2 -- Watering Methods :
Comment:
The camera angle (taken from front) is misleading: All four plants are very close to the same size. I had started with the two on wicks slightly larger and they now MAY??? be slightly smaller????
I had expected the pot sitting in water 5 or 6 days out of 7 to be too wet and by the 'finger test', it was too wet. I expected it to rot! Yet, it seems to be doing fine. They all have approx the same number of leaves but, if I had to choose, I would say the leaves are larger on the contant-level 'real' Texas Style. ??? !!! :)
There are buds on the two wicked plants, but they were slightly larger at the beginning, so blooming time will not be counted in this experiment.
The goal of this experiment was to see if any of these methods of watering would make it easier and quicker for me to maintain a larger number of plants through the busy summer months.
I expected the wicked methods to be easiest, and by a very small degree, they are. However, the constant-level TS has been very easy: just add water whenever I notice the saucer is empty or nearly so!
 |
| No-Name Double Pink plants on 12/6/2012: Top Left: Saucer watered *** Top Right: constant-level Texas Style Bottom Left: felt wick *** Bottom Right: yarn wick |
 |
| No-Name Double Pink plants on 1/9/2013: Left Top: saucer watered *** Left Bottom: constant-level Texas Style Right Top: felt wick *** Right Bottom: yarn wick |
The camera angle (taken from front) is misleading: All four plants are very close to the same size. I had started with the two on wicks slightly larger and they now MAY??? be slightly smaller????
I had expected the pot sitting in water 5 or 6 days out of 7 to be too wet and by the 'finger test', it was too wet. I expected it to rot! Yet, it seems to be doing fine. They all have approx the same number of leaves but, if I had to choose, I would say the leaves are larger on the contant-level 'real' Texas Style. ??? !!! :)
There are buds on the two wicked plants, but they were slightly larger at the beginning, so blooming time will not be counted in this experiment.
The goal of this experiment was to see if any of these methods of watering would make it easier and quicker for me to maintain a larger number of plants through the busy summer months.
I expected the wicked methods to be easiest, and by a very small degree, they are. However, the constant-level TS has been very easy: just add water whenever I notice the saucer is empty or nearly so!
Experiment #4 -- Soil Mix Additions JAN UPDATE
Updating Experiment # 4 -- Soil Mix Additions
Comments: Both mixes with additives are doing better than my mix plain. In this case, the pot with loam added has more leaves and the pot with the soil conditioner have darker colored leaves.
Edited:
The goal for this experiment was to determine if adding some 'live bacteria and organisams' to my 'artificial' mix would give the plants some advantage.. maybe better able to absorb/use fertilizers, or keep soil fresh and neutral, etc.
 |
| Optimara Bora Bora plants on 12/6/2012 Top: my mix with Happy Frog Soil Conditioner Middle: my mix Bottom: 1/2 my mix, 1/2 garden loam |
 |
| O. Bora Bora plants on 1/9/2013 Right: my mix with Happy Frog Soil Conditioner Middle: my mix Left: 1/2 my mix, 1/2 garden loam |
Comments: Both mixes with additives are doing better than my mix plain. In this case, the pot with loam added has more leaves and the pot with the soil conditioner have darker colored leaves.
Edited:
The goal for this experiment was to determine if adding some 'live bacteria and organisams' to my 'artificial' mix would give the plants some advantage.. maybe better able to absorb/use fertilizers, or keep soil fresh and neutral, etc.
January 6, 2013
Update on MILDEW
Update on the mildew problem:
As expected, correcting the cause was the saving of the situation!
But from past experiences, I knew that simply creating a good mildew-free environment wouldn't completely eliminate the problem since the powdery mildew spores were still floating around.
So, I misted the Lysol over most of the growing areas every three days. I did mist my 'mama' mature and blooming plants once, very lightly, after removing all open blossoms that would have the most probability of having unseen mildew on the backsides. The leaf trays and streps also were misted.
The tray of babies that was so badly infected/affected were left so that I could see what the milk/clove oil/water combo did. I sure hated to take a chance, but since I have been in an 'experiement' mood this winter (thanks again, Laurie!) I just had to.
Ten days later, and there was no return of mildew.. and yes, I did put on my glasses! In the past, it often returned in five days to one week. So on the eleventh day, I misted the leaf tray and the Maverick's Faded Jeans plant with the Lysol.
The mildew did leave it's 'mark'... some of the leaves on plants most often touched developed brown marks or brownish tints. I read somewhere that the mildew actually enters the leaf and feeds on the plant's cells. Kill the mildew and it will stop doing more damage, but any cell damaged will die or show stress.
Anyway, now that my canary hen hatched several baby chicks, I have to be careful with the Lysol spray... the smell drifted throughout our house since several of my violet stands are in the open living areas. Cautions include dangers to household pets, including birds. So, I will continue to mist the sales plants with the Lysol on a schedule, in another room with an exhaust fan going and the door closed. But my personal plants in our living areas will get the milk treatment.
Subscribe to:
Posts (Atom)